Halloween + The Perfect Sugar Cookie

Happy Halloween!

I can’t believe it’s already the last day of October and that we are jumping in to the last part of the year. Halloween begins my favorite time of year for many reasons. The holidays are fast approaching and there is always an excuse to get together with family and friends. Holiday traditions are so important to me and I am enjoying the fact that Bryan and I can share in each other’s own traditions now. 

This past weekend was the perfect Halloween weekend. I was so excited to wake up early on Saturday and surprise Bryan with some pumpkin chocolate chip bread. I consider myself lucky that I have a husband that buys in to the pumpkin craze as much (and sometimes more!) than I do. I used a recipe from SistersMarie, a lifestyle blog written by my cousins, Kaitlyn Agnew and Lisa Fergus. I often find myself spending hours reading through their words and this recipe for Pumpkin Chocolate Chip Bread definitely caught my eye this weekend. You can find the recipe here. Kaitlyn and Lisa always provide the best recipes, ideas for home decor, and fashion inspiration. 

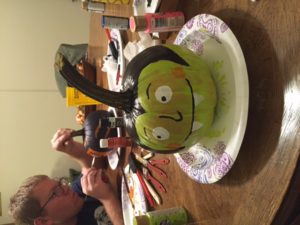
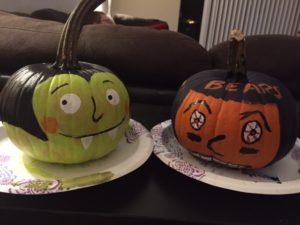
After filling the house with the smell of warm pumpkin bread (Bryan woke up not long after, his nose directed him straight to the kitchen) we turned on Hocus Pocus and it officially felt like Halloween. We also finally got around to one of my favorite traditions- painting pumpkins! We purchased our pumpkins from Bengston’s Pumpkin Farm in Homer Glen, IL last week. There are endless pumpkins to pick from  in all shapes and colors. We picked medium-sized traditional ones with long stems to paint. In addition to picking our pumpkins at Bengston’s, Bryan, myself, and two of our friends watched pig races and ate warm apple cider donuts. It was a perfect fall evening and I look forward to going back next year. I painted a friendly vampire and Bryan painted an angry looking Chicago Bears player. 

img_3475 img_3476

Saturday night we attended a Halloween Party at a friend’s house and everyone brought a dish to share. A lot of the guest list had chosen to bring a dip of some sort so I decided to bring something to cure everyone’s sweet tooth for when the Taco Dip and tortilla chips were long gone. I could not write a blog centered around finding the ‘sweet’ in each day without mentioning my absolute favorite sugar cookie recipe. While most of the time I am finding ways to make everyday recipes just a bit healthier, I am a firm believer in the word ‘moderation’. Without allowing yourself to experience that chocolate cupcake you’ve been thinking about for weeks or in this case, the adorable cookies at this weekend’s Halloween Party, you’re likely to resent those healthy foods all together. This is the most important lesson I learned from WW. 

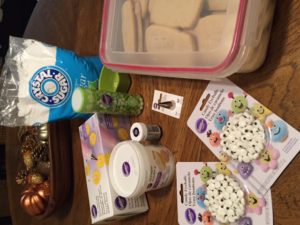
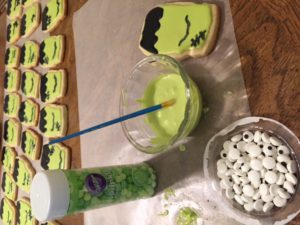
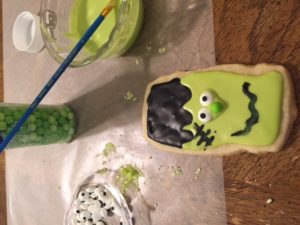
This recipe is from Marian at Sweetopia.Net and is my go-to for various holiday cookies. I have made many Christmas cookies out of this recipe as well as McDonald’s themed cookies complete with the Golden Arches for my office after a long week at work. The most important part of this recipe is to make the dough well before baking the cookies. The recipe says to chill dough for at least an hour before baking but I decided to premake my dough on Thursday night. I rolled, cut, and baked the cookies on Friday night and decorated with homemade royal icing on Saturday morning. The longer the dough chills, the less the cookie spreads while in the oven. This is key in holding the cookie’s shape. 

img_3480 img_3478

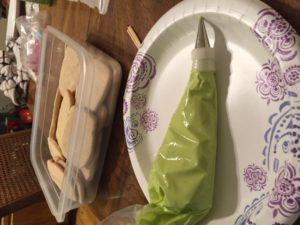
I love using Wilton’s disposable piping bags to decorate cookies. 

img_3482 img_3483 img_3485

The cookies turned out great and so did our costumes. We went as Squints and Wendy Peffercorn from ‘The Sandlot’. One of the most clever costume themes I saw was from three girls each dressed as Salt, Lime, and Tequila. Though my favorite belonged to my friend, Lexi, who went as Elliott from ET. I give her a lot of credit because it was an obvious struggle carrying the milk carton around all evening, but it was worth it because she won the costume contest. 

img_3489 img_3490 img_3488

I hope your Halloween Weekend was filled with lots of good friends and good treats!

Sugar Cookie + Royal Icing Recipe
Yields 30
Write a review
Print
Cook Time
10 min
Cook Time
10 min
For The Cookies
  1. 2 cups unsalted butter (at room temperature)
  2. 2 cups sugar
  3. 2 large eggs
  4. 3 tsp vanilla
  5. 5 cups all purpose flour
  6. 1 tsp salt
For the Icing
  1. 2 tbsp meringue powder (sold at Wilton)
  2. 1/4 cup water (plus more for thinning)
  3. 4 cups powdered sugar
  4. 1 tsp vanilla extract
Cookies
  1. Cream the butter and sugar together in the bowl of an electric mixer on low to medium speed. (Use the paddle attachment). Mix until thoroughly incorporated - for about one minute. Scrape down the sides of the bowl with a plastic spatula and mix again for a few seconds more.
  2. Over mixing the butter and sugar in this step will cause too much air to be incorporated into the dough. If you'd like a light and fluffy cookie, that's ideal, however the dough will spread more during baking; not ideal if you'd like the cookie to hold its shape.
  3. Add eggs slowly and mix. Scrape down the bowl with your spatula at least once and mix again.
  4. Cut open your vanilla bean and scrape the seeds out. Add to mixing bowl. Alternatively, add liquid vanilla extract. Stir briefly.
  5. Sift your dry ingredients together. (Flour, baking powder and salt).
  6. Add all of the flour mixture to the bowl. Place a large tea towel or two small tea towels between the edge of the bowl and the electric mixer so that the flour won't escape. Mix on low speed for 30 seconds. Remove the tea towels and observe the dough mixing; when it clumps around the paddle attachment it's ready. It's also important at this stage not to over mix the dough (the glutens in the flour develop and the dough can become tough).
  7. Roll the dough out between 2 large pieces of parchment paper. Place on a baking sheet and into the fridge for a minimum of 1 hour.
  8. Roll out the dough further if you need to, and cut out cookie shapes. Place on parchment paper-lined baking sheet. Re-roll scraps and repeat.
  9. Put cookie dough shapes back into the fridge for 10 minutes to 1 hour to chill again. They will then hold their shape better when baked.
  10. Preheat your oven to 350°F or 176°C.
  11. Bake cookies for 8-12 minutes or until the edges become golden brown (I found that I needed the full 12 minutes, if not, a bit more because my cookies were larger)
  12. Let cookies cool to room temperature and decorate!
Icing
  1. In a large bowl, whisk together meringue powder and water until a slight foam forms.
  2. Add in powdered sugar and vanilla and mix until icing becomes light and airy, about 2 minutes.
  3. If the mixture is too thick and not mixing well, add more water, 1 tbsp at a time.
  4. If adding coloring, separate in to smaller bowls and mix with desired food coloring.
Adapted from Sweetopia.Net
Sweet T and a Honey B https://www.sweettandahoneyb.com/

Peanut Butter Blossoms

 img_3455 

Have you ever had one of those days where you have a sudden craving for something you haven’t had in quite some time? Friday was one of those days. Lately, my team at the office has been experimenting with strange/weird combinations of cookies and treats (Candy Corn and Peanuts…Red Velvet Oreos… Butterscotch M&Ms…) which means there has been a lot of sugar hanging around our cubicles. All of this cookie talk on Friday left me thinking more about baking my own treats and less about actual work as it got closer and closer to 5 o’Clock. 

I was looking for something to bake that didn’t take much time and I that I already had most of the ingredients for in my baking cabinet. I developed a sudden taste for something peanut butter related and naturally the first thing that came to mind was Peanut Butter Blossoms. It’s a timeless cookie and would definitely satisfy my sweet tooth. 

In the spirit of taking some of the guilt out of these cookies, I decided not to use any flour. I have seen numerous recipes that completely eliminated the flour out of these cookies and that still looked delicious. In addition to this, I decided to add a ground flax/chia seed blend to the dough-an ingredient I have recently become obsessed with adding to a lot of my baked goods. This blend packs a lot of protein (even more than nuts) and also delivers a dose of heart healthy Omega 3’s.  Hodgson Mill Brand makes a relatively inexpensive blend that is easy to incorporate in many recipes. 

This recipe also makes about 4 dozen cookies so it’s a perfect treat to keep on hand for any weekend get-togethers. 🙂 

Peanut Butter Blossoms
Yields 4
A classic cookie packed with lots of protein.
Write a review
Print
Prep Time
10 min
Cook Time
8 min
Prep Time
10 min
Cook Time
8 min
Ingredients
  1. 2 Cups Organic Light Brown Sugar
  2. 2 Cups (1 Jar) Smuckers Natural Creamy Peanut Butter
  3. 1/2 Cup Hodgson Mill Ground Flax/Chia Seed Blend
  4. 2 Eggs
  5. 2 tsp Vanilla Extract
  6. 48 Hershey's Kisses
Instructions
  1. 1. Preheat oven to 350 Degrees.
  2. 2. Mix Peanut Butter, Flax/Chia Seed Blend, Brown Sugar, Eggs, and Vanilla until ingredients become dough-like.
  3. 3. Use a regular sized cookie scoop (or roll tablespoon balls) and place on a lightly greased cookie sheet (I used coconut oil cooking spray).
  4. 4. Using a metal spoon, very lightly pat down tops of balls of dough to flatten just a little bit.
  5. 5. Bake for 8 minutes
  6. 6. Immediately after baking, gently push one Hershey's Kiss in to the center of each cookie.
  7. 7. Let cookies fully cool before serving
Sweet T and a Honey B https://www.sweettandahoneyb.com/

A La’ Wonderful

img_3429


Last week, the temperature dropped below 75 degrees and I saw the first yellow leaf on the tree outside my balcony window. Within minutes, I was burning a pumpkin candle and finding a place to put my new favorite Halloween decoration purchased from Kirklands- a metal ghost with a silly smile on his face and a trick-or-treat bag. A completely necessary purchase.

With all of the amazing things this time of year brings, heavier meals and desserts come with it. I am forever trying to make “normal” recipes just a little healthier and the fall and holiday seasons are no different. Luckily our most recent obsession can easily be incorporated in to many recipes, is sweet, and is good for you-Honeycrisp Apples! 

One evening last week, I decided I was going to make some baked apples using the multitude of apples I purchased. There are a ton of baked apple recipes out there and they usually involve a combination of a lot of brown sugar, oats, granola, raisins, etc-all of which I love. Though, all add a lot of Weight Watcher points for Bryan and I. I thought that a few simple ingredients could be added while still making these apples just as tasty. Then, if I wanted to add a couple tablespoons of raisins and/or granola on top of my portion, I could. 

The apples themselves are to die for but perhaps the best part of this dessert was something Bryan and I discovered a few months ago. If you are an ice cream lover and haven’t tried Halo Top Ice Cream you are seriously missing out. They have a handful of flavors to choose from and they all taste like REAL ice cream. Bonus- the whole pint is only 240 calories. My favorite has to be the Birthday Cake flavor but I am excited to try their new S’more Flavor! Check out all the flavors (including the 10 new ones!) here

Pop these apples in the oven and enjoy with 1/2 cup of Vanilla Halo Top. I look forward to making this delicious dessert all season!


img_3431-1 img_3395 img_3393

Baked Apples A'La Mode
Serves 5
A dessert perfect for fall evening
Write a review
Print
Prep Time
15 min
Cook Time
20 min
Prep Time
15 min
Cook Time
20 min
Ingredients
  1. 5 Large Honeycrisp Apples (peeled and diced)
  2. 2 tbs Honey
  3. 1/4 Cup Brown Sugar
  4. 2 tbs cinnamon
Instructions
  1. Preheat the oven to 350 degrees
  2. Place peeled and diced apples in a large 9/13 baking dish
  3. Sprinkle apples evenly with honey, sugar, and cinnamon
  4. Bake for 20 minutes and serve warm with 1/2 cup of Vanilla Halo Top!
Sweet T and a Honey B https://www.sweettandahoneyb.com/

A Twist on the Meatball Sub

img_3333


Everyone’s refrigerator door is stuffed with various condiments, dressings, and sauces that they bought for a recipe one time and never had to use again (I can’t be the ONLY one that has 8 salad dressings in the fridge, right?). However, the one thing that is on constant rotation is buffalo sauce. Most Weight Watcher friendly recipes don’t call for a lot of extra sauces-usually they pack the most points due to fat, sodium, carbs, and sugar so we pay close attention to these labels. Buffalo Sauce is not the worst in general-but one day Bryan and I stumbled upon Bulliards Buffalo Style Chicken Wing Sauce and now we don’t use any other brand. It’s got 1g Fat and 380mg of Sodium per Tbs. While the sodium isn’t ideal, it’s less than anything we have found. 

Last fall, we discovered that we could make our own meatball sub sandwiches and stay within our points. It was great until I read all of the artificial ingredients that were in the frozen bags of meatballs we bought every other week. A big lesson Bryan and I have learned from being on WW for the last 5+ years is that less points doesn’t ALWAYS mean less artificial additives in food. We love the flexibility of the program and that on a busy evening we can still choose something “quick” (ie; heat up those frozen meatballs), but 99% of the time try our best to pay attention to the ingredients as well as the nutrition label. Long story short-I needed to figure out how to make my own tasty buffalo style meatballs. 

My husband took the first bite of his sandwich, closed his eyes, and said a gargled “OERRGHHMYYGUURDD” we are all familiar with when we taste something we love . I knew I had succeeded. I think next time I might try these on top of a salad with a little light blue cheese dressing, cucumbers, and shredded carrots to eliminate the bread. You can even place these on top of a small bowl of quinoa. I love when I can make a huge batch of something, freeze it, and use it for different meals as it prevents us from getting bored. This is an easy one that is sure to please even the pickiest of game-day meatball sub eaters 🙂 


Buffalo Chicken Meatball Subs
Serves 7
A tasty twist on a traditional meatball submarine with a little bit of spice!
Write a review
Print
Prep Time
20 min
Cook Time
18 min
Prep Time
20 min
Cook Time
18 min
Ingredients
  1. 1lb Lean Ground Chicken or Turkey
  2. ¼ cup dried breadcrumbs
  3. ½ tbs Garlic Salt
  4. 1 tsp pepper
  5. 1 egg
  6. 3 tbs Buffalo Sauce
  7. ½ cup Chopped Onion
  8. ¼ cup blue cheese crumbles
  9. 6 Small Submarine Rolls
  10. Additional blue cheese crumbles and buffalo sauce for sandwiches
Instructions
  1. 1. Spray a baking sheet with non-stick cooking spray (Again, I used Pam’s Coconut Oil spray).
  2. 2. Preheat oven to 400 degrees.
  3. 3. Combine breadcrumbs, egg, onions, blue cheese, garlic salt, and pepper in a large mixing bowl.
  4. 4. Add ground chicken and mix well.
  5. 5. Roll in to 1-1 ½ inch balls and place on baking sheet.
  6. 6. Bake for 16-18 minutes or until cooked all the way through
  7. 7. Once cooked, place 3 meatballs on a small sub roll and sprinkle each sandwich with a tablespoon of blue cheese crumbles and a tablespoon of buffalo sauce. Serve with baby carrots and cucumbers.
Sweet T and a Honey B https://www.sweettandahoneyb.com/

Avocado Makes Everything Better

Follow my blog with Bloglovin

img_3325 img_3326 img_3327

I spent a good part of the afternoon yesterday trying to decide what would make the ‘perfect first post’. As I was prepping our breakfasts for the week I still had yet to decide. Then as I was assembling said breakfasts for the week, it hit me. Why don’t I just jump in and post about something I was already doing? Breakfast Sandwiches.

A little background- my husband requested something quick, healthy, and still delicious (often times it’s hard to capture all three requests in one) for breakfast during the week. We had bought our 7,410,365th box of blueberry Eggo waffles this year and he finally said he was Leggo’ing his Eggo.

When it comes to breakfast sandwiches, I’m still true to the McMuffin. Maybe it’s because they remind me of my childhood, maybe it’s because they truly are delicious, or maybe it’s because now I work for the company. I think it’s a combo of the three. Whoever says they don’t like McDonald’s breakfast is lying to your face- just sayin’. Since I love the McMuffin so much, but I also love a healthier breakfast choice- I decided that meal prepping my own version of these would be perfect. Plus I could add all the avocado I wanted.

Bake Ahead Breakfast Sandwiches
Serves 6
A quick, easy, and delicious breakfast that can be eaten on the go.
Write a review
Print
Prep Time
30 min
Cook Time
10 min
Prep Time
30 min
Cook Time
10 min
Ingredients
  1. 1 Package of Thomas’ Multigrain Lite English Muffins
  2. 6 Eggs
  3. 3 Slices of your favorite cheese (I use a lighter cheese like Part-Skim Mozzarella or Provolone. ½ Slice per Sandwich)
  4. 6 Slices of turkey bacon (or ham if you prefer!)
  5. A pinch of Garlic Salt for each sandwich
  6. Veggies of your choice (I always add Red Pepper and Avocado to my Sandwiches)
  7. 6 Sheets of wax paper
  8. One large freezer bag
  9. Note: Festive Stickers are optional, but COMPLETELY necessary. I thought it would put a smile on Bryan’s face to find a smiling pumpkin on his sandwich in the morning 
Instructions
  1. 1. Preheat Oven to 350 Degrees
  2. 2. Spray a muffin tin with cooking spray (I am obsessed with Pam’s new Coconut Oil Cooking Spray)
  3. 3. Crack one egg inside of each cup and gently whisk with a fork (you could also do this with egg whites but I would recommend using 2 egg whites for each cup)
  4. 4. Bake for 10 minutes.
  5. 5. While eggs are baking, separate each English muffin and cut slices of cheese in half.
  6. 6. Cook your turkey bacon for 3-5 minutes over low-medium heat on the stove (I like mine crispy so I cook mine a little longer).
  7. 7. Once your eggs are cooked, gently use a fork to take them out of the muffin tin. If you used enough cooking spray they should pop out fairly easily.
  8. 8. Assemble your sandwiches with egg, cheese, and meat.
  9. 9. Wrap each sandwich in a sheet of wax paper and secure with a piece of tape.
  10. 10. Place all sandwiches in a freezer bag and place in the freezer to have ready for the whole week!
  11. 11. **For Micro-waving: Heat directly from freezer. Microwave for 1 minute and separate sandwich. Most likely, the egg will still be cold, so place back in Microwave and heat for another 30 seconds.
  12. 12. After heating, add your favorite chopped veggies, a pinch of garlic salt and/or in my case, LOTS of avocado and Enjoy!
Sweet T and a Honey B https://www.sweettandahoneyb.com/

–TB