‘Rad’ Christmas Gift Tags

For the last couple of years I have been really in to making my own gift tags for all of my Christmas packages. It’s a cute way to personalize gifts and while it takes a little longer than the sticky kind (don’t get me wrong, I still use those too!), I find that I actually save money and you can easily put something together that looks amazing while using minimal materials.

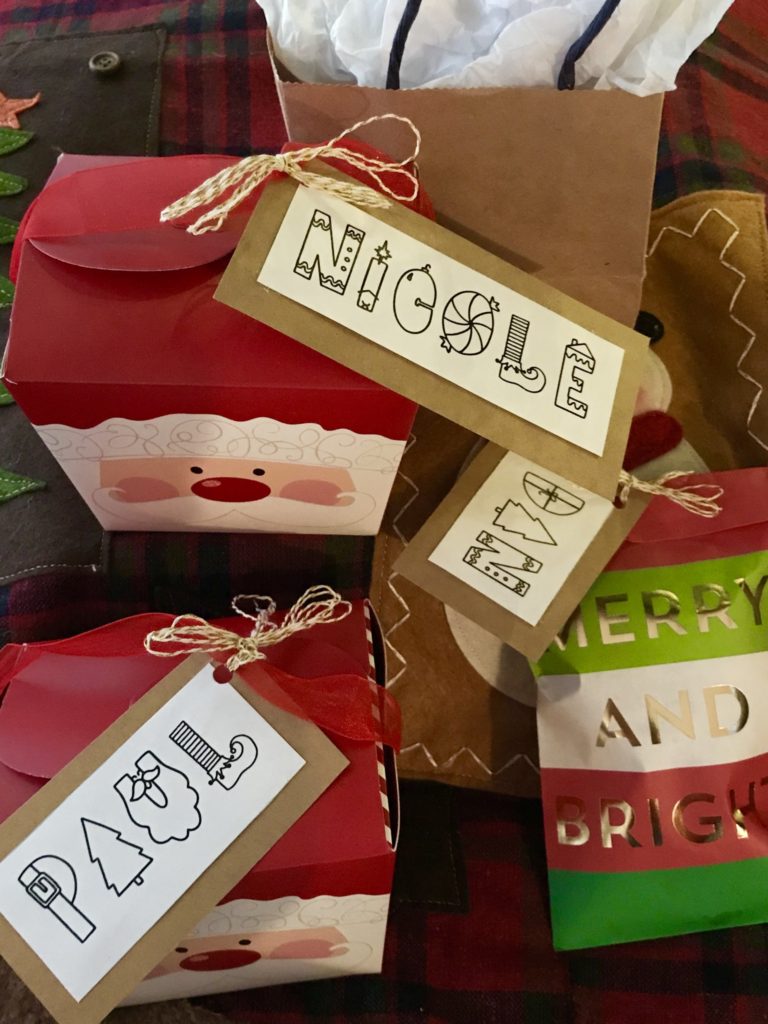
I used a little help from a company/brand called ‘Rad & Happy‘ for my gift tags this year. A good friend introduced me to this brand created by Tara, an incredibly talented and creative artist and blogger who designs just about the most adorable stationary, gift cards, coloring pages, apparel, and holiday items I’ve ever seen. She even offers a subscription service called ‘Rad Mail’ which allows you to get some of these goodies delivered to your door monthly! This year, Tara created a font called ‘Rad Tidings’ (I know.. I know.. I’m even in love with the name). Ordering,downloading, and installing this font was as easy as 1,2,3. From there all I had to do for my gift tags was type the names of all of my friends and family in a word document. I a PDF of all of the names over to my local OfficeMax to print on white cardstock (less than $1) and within an hour I was able to pick up the sheets!

From there, I carefully cut out all of the names and backed them on Kraft cardstock (A little known fact about me, I LOVE kraft paper/cardstock and use it for just about everything…including last’ year’s tags 😉 ). For gift bags and small cookie boxes, I used a hole punch and some gold or candy striped twine (found for 60% off at Michael’s this time of year) and for large wrapped presents, I found a cute roll of Christmas washi tape (also 60% off at Michael’s) to help me stick the tags on my gifts.  

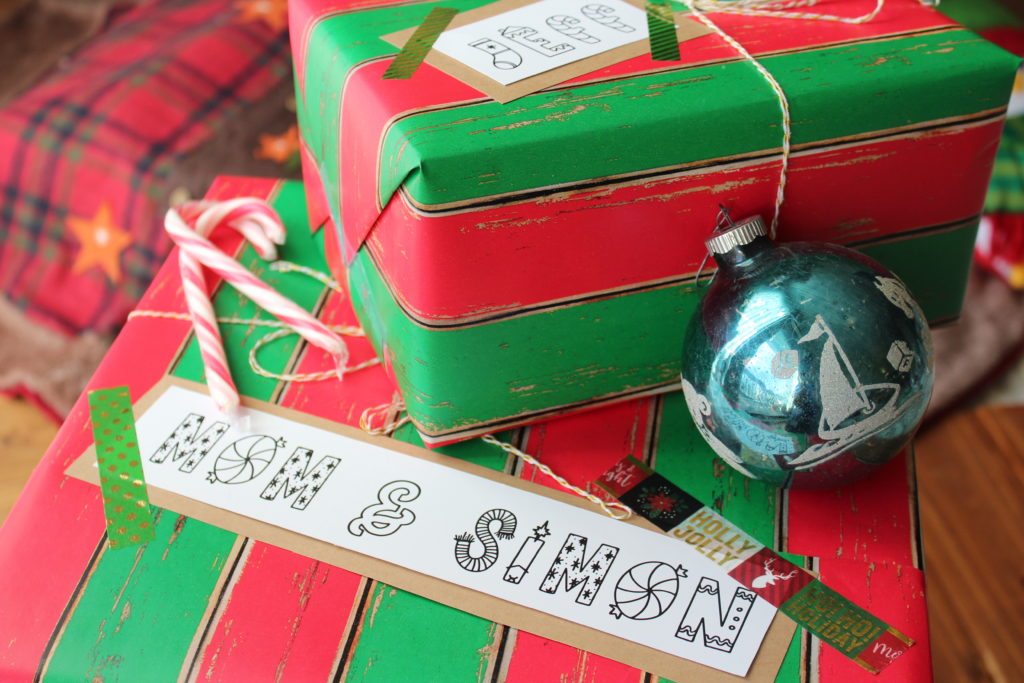
It’s so simple to make a big statement when giving your loved ones Christmas (or birthday, annivesary, etc.) packages. Taking a few extra minutes to personalize when it comes to the wrapping puts a little extra love in your gift!

5 days left until Christmas y’all! I hope this last week is a merry one and that you enjoy this time with your family and friends!

Sweet Saturday no. 1

Happy Saturday, everyone!

In relation to my 2017 goal (I’m unsure how I feel about the word ‘resolution’) of trying to appreciate the little things that happen every day, and not just on the weekends, I thought I would begin something called ‘Sweet Saturdays’. I’d love to spend some time sharing a handful of the things that made my week a little sweeter in hopes of providing some ideas for you too! 

I will say- this week was a great one. A new mindset, a new year, a new gym, and new episodes of my favorite television shows (Any #Nashies out there?) made for a fabulous first full week of 2017. I hope that you too kicked this year off on the right foot! 

HIIT Treadmill Workouts

I’ve recently become bored with my cardio workouts and needed something to change it up. Unfortunately, Chicago Winters do not provide a lot of opportunity to run or walk outside, so I tend to get stuck to those 30 minute elliptical sessions or runs at the gym. I can still get a great workout in, but find that my body gets used to it after a while. While reading one of my favorite health and fitness blogs, Peanut Butter Fingers, I found that Julie often provides a lot of high intensity interval training (HIIT) treadmill workouts that anyone has time for. HIIT Workouts use a combination of speeds and intensities to slow and speed up your heart rate. This way you not only burn calories, but fat too. And SWEAT like a beast! Here is one of Julie’s 20 minute workouts that I tried out.


2017 Thankful Jar

Thanks to a friend that posted this idea on facebook, I decided to make my own ‘Thankful Jar’ for the year. Each day, Bryan and I can write one good thing that happened that day or that we were thankful for that day and put it in the jar. On New Year’s Eve we can take turns reading all of the things that happened during the year. This is also a great idea for those with kids! We have a lot to be thankful for so I know it’s going to fill up fast.


Halo Top Ice Cream

If I had to pick one dessert to eat for the rest of my life, it might very well be Halo Top Ice Cream. I like to think of this as the hidden gem of Ice Creams. Bonus, it’s completely healthy. Yes, you read that right, it’s healthy.

After trying various healthy “ice creams” from the freezer section at Marianos, I was sold on the idea there was no such thing as a healthy ice cream that tasted like, well, actual ice cream. Then I started to read about something called ‘Halo Top’. I learned that I could buy it at my local Whole Foods and decided to pick up a pint. 

Then I picked up another pint. 

And then another. 

And then I followed them on every social media outlet and anxiously awaited the arrival of their 10 new flavors. 

A pint of this delicious cold treat is low calorie, high-protein, low sugar, and the ingredients are all natural. It also happens to be Weight Watcher friendly! It’s only 3 points for a half cup! They come in a ton of different flavors and you’d never know this wasn’t served up at your local ice cream shop. I purchased the S’more flavor for hubs and I this week and let’s just say another trip to Whole Foods is on my errand list for today. 

All Wrapped Up

Merry Christmas Eve! This morning begins my two most favorite days of the year and while there is still a lot to be done before I host Christmas Eve for our families and pack up the presents for tomorrow’s festivities, I hope to get a few minutes every now and then to step back from the craziness and enjoy everything I love about Christmas (including helping myself to a large sample of the chocolate covered pretzels I make every year.. 😉 )

While my list of favorites during Christmastime is never ending, picking out my wrapping paper/tissue/ribbons for the year and actually wrapping the presents would be near the top. There’s something about a perfectly wrapped present (or a gazillion) for our family and friends under our little tree that puts me in the mood. I swear I could sit for hours wrapping presents in front of ‘It’s A Wonderful Life’ for the 19th time on ABC Family (Refusing the ‘freeform’ name. Is anyone else annoyed by this?). 

This year, I wanted to add a little creativity to my gift tags. It takes a little longer than the sticky tags, but it was totally worth it and added a personal touch to each gift. I was all about brown paper, plaid, twine, and a little gold glitter this time around. I picked out some plain kraft paper gift tags (here) to decorate. I wandered over to the stamp aisle to look at the Christmas stamps and picked one that says “Merry & Bright” (one of my favorite lines during Christmas). I had a black ink pad at home as well Modge Podge and some (Okay, A LOT) of leftover loose gold glitter from DIY’ing my wedding decor. 

I love the look of just a small amount of glitter added to something plain to make it pop. I sponged a very small amount of Modge Podge on to the end of each tag and then dipped it right away in to the glitter. After letting them dry overnight, I used my new stamp. From there, I wrote who the present was for/from with a thin black Sharpie pen. It took just minutes longer than the normal stickies (I still used some of those too! I found ones that matched my plaid paper 🙂 ) and the gifts are all sparkling under the tree. I have a lot of the kraft tags leftover so with a couple different colors of loose glitter these are perfect to save for birthdays or showers too! 

My chocolate is melted and the pretzels are ready for dipping so it’s time for that sampling before the craziness begins. I hope you have a truly wonderful holiday spent with your family and friends. Merry Christmas!

–TB

The Little Blue Hutch

It’s probably pretty easy to think of a handful of things that remind you of your childhood home- a smell, a sound, a tradition, or even a piece or furniture or decoration. Chances are these things are part of your most vivid memories growing up. For me, it is the creaky sound the section of floor right in front of my parent’s bedroom made when I stepped on it. I would always step over it when I wanted to get up early and not wake them. Or, how every Thanksgiving or Christmas, my mom would be up early cooking and I would wake up to the smell of the pistachio cake she was making to bring to the party. The sounds of Johnny Mathis would always be playing on our computer. 

While the creaky floor, the smell of her Pistachio cake, and Johnny Mathis will always be part of my favorite memories, perhaps the most precious item was a piece of furniture that I never gave much thought to growing up- a little blue hutch that sat in our dining room. This hutch always held random odds and ends- cookbooks, pottery I made as a preschooler, salt and pepper shakers, and some crystal my Grandfather used to collect that got passed down to my Mom. She bought this for our first condo before I was even born and eventually traveled with us to our first home on the north side of town. Five years after that it came with us to the house I would spend most of my life in. It always sat in the corner and was very rarely touched or changed. Though, when I look at pictures of every family party we hosted- no matter what house- it’s always in the background. 

This past summer, a year and a half after my husband and I moved in to our first home, we were still in search of a few perfect pieces of furniture to complete some empty walls and corners. It just so happens that my mom was in the process of moving out of the home I grew up in. It was an emotional process to say the least, but the house was getting to be too much for her to handle and I was so happy that she was moving in with the man she loved. In the midst of finally getting around to taking what I wanted from the house, I also picked out a few items I would love to see in my own home. A wooden rum crate used for comfy throw blankets, our over-sized coffee table, and the blue hutch all became ours. It’s amazing that these three pieces were exactly what we were looking for and didn’t even know it. I love sitting in our living room looking at these things that were part of my memories of the house on Washington Street. 

While the hutch fit perfectly, I won’t lie that it looked a little worn. The paint was dull and the bright blue color didn’t go with much in our house. I knew I wanted to give a little life to it. After a trip to Home Depot to find the perfect color paint, I wanted to get started right away. 


My original idea was to take an electric sander to it, however I didn’t know if it would hold up. The wood is pretty fragile. Luckily the stormy gray color I picked was not all that different from the original blue. All I needed was a coarse sanding sponge by 3M to sand off the first layer by hand and two coats of the new paint to make it look new again. After painting, I picked out a few accessories to dress it up even more. I found an adorable rose gold colored fruit basket with a wood trim at Anthropologie. I also selected some new knobs at World Market to replace the plain ones on the cabinets. Again- in rose gold. As a final touch, I wrote the addresses of each of the places this little hutch has sat in on the back. Each time we move, and take it with us, I will be reminded of how many places I have called home. 

Luckily it also happens to be Christmastime and I needed somewhere to display our Christmas cards. A little leftover burlap and some tiny clothespins made this in to a perfect display for our cards this season.

It’s amazing what a few hours of time, some carefully selected decorations, and two coats of paint can do to an old piece of furniture. I was so excited when I could place my completed project in the corner of our own dining room. To all my friends who have moved or are in the process of moving out of the house where they grew up-I highly suggest asking for a piece of that home to go with you. It can turn in to a fun and rewarding project, fill that empty corner because nothing else seemed ‘just right’, and help create new memories. 


–TB